Beautiful Card Designs Made Easy

October 16, 2015

Friday Freebie 089

Hi Everybody,

Mint green is the flavour of the day for this weeks Friday Freebie and the inside is lined to match the front

I have used the Bracket Borders Two for this design and there is a video to show you how to use this type of die

The video shows Bracket Borders One  but the principal is the same

The bottom panel is cut with Lonely Hearts  and this die is in two pieces that will cut the pattern either separately or leave it in the card

If this is a card that you would like then simply leave me a comment and from those comments a name will be chosen and the winner announced in tomorrows blog post.

Please come back to check if you are the winner as you only have 48 hours in which to claim the card

More tomorrow ...

Hugs xx

October 15, 2015

International Ambassadors Informal Blog Hop

Hi Everybody,

Well this is the tenth blog hop  the International Ambassadors have done and it's amazing how time flies past.

We really appreciate that you hop along with us and leave us your wonderful comments and we really hope you will join in this month too.

The theme for this month was the Party Collection from Spellbinders
 and I have chosen to use the Fun On A String

I have used bright colours as this would be ideal for a teenagers card. The die comes with an extra backing piece that can be added to the balloons. And there are small hearts and stars for added decoration if you want to use them.

I have teamed it with the Happy Birthday Garland which I have cut three times in black and layered them together.  The tiny hearts have just been dotted around the card.

Please pop along to see what the others have come up with  and you won't be disappointed as they are very talented ladies.  Leave them a comment to let them know you visited.

Linda Lucas - Australia
Yvonne van der Grijp - Netherlands
Christina Emberson - UK
Christina Griffiths - that's me !!

I hope you enjoy your trip around the world 

More tomorrow ...

Hugs xx

October 14, 2015

You Are My Sunshine ...

Hi Everybody,

Todays cards are some of the samples I will be showing you next week on Create and Craft.

It is one of the new die from the Simply Said Collection from Spellbinders.

There are several in the collection that all say different things and  this one is You Are My Sunshine 

These dies are designed to create a full card front for you in one easy pass.

I have chosen to do mine in black card and add it to a Brusho Background for a dramatic look.
The pink one is with Centura pearl card and I have inked through the die before removing the card

Very plain very simple ... no flowers no ribbons and no pearls on either of these

I hope you will join me for the 4 Day Deal  next week from the 19 th October on Create and Craft

More tomorrow ...

Hugs xx


October 13, 2015

Tuesday Tutorial - Happy Days

Hi Everybody,

Todays tutorial is using one of the newest die templates that 
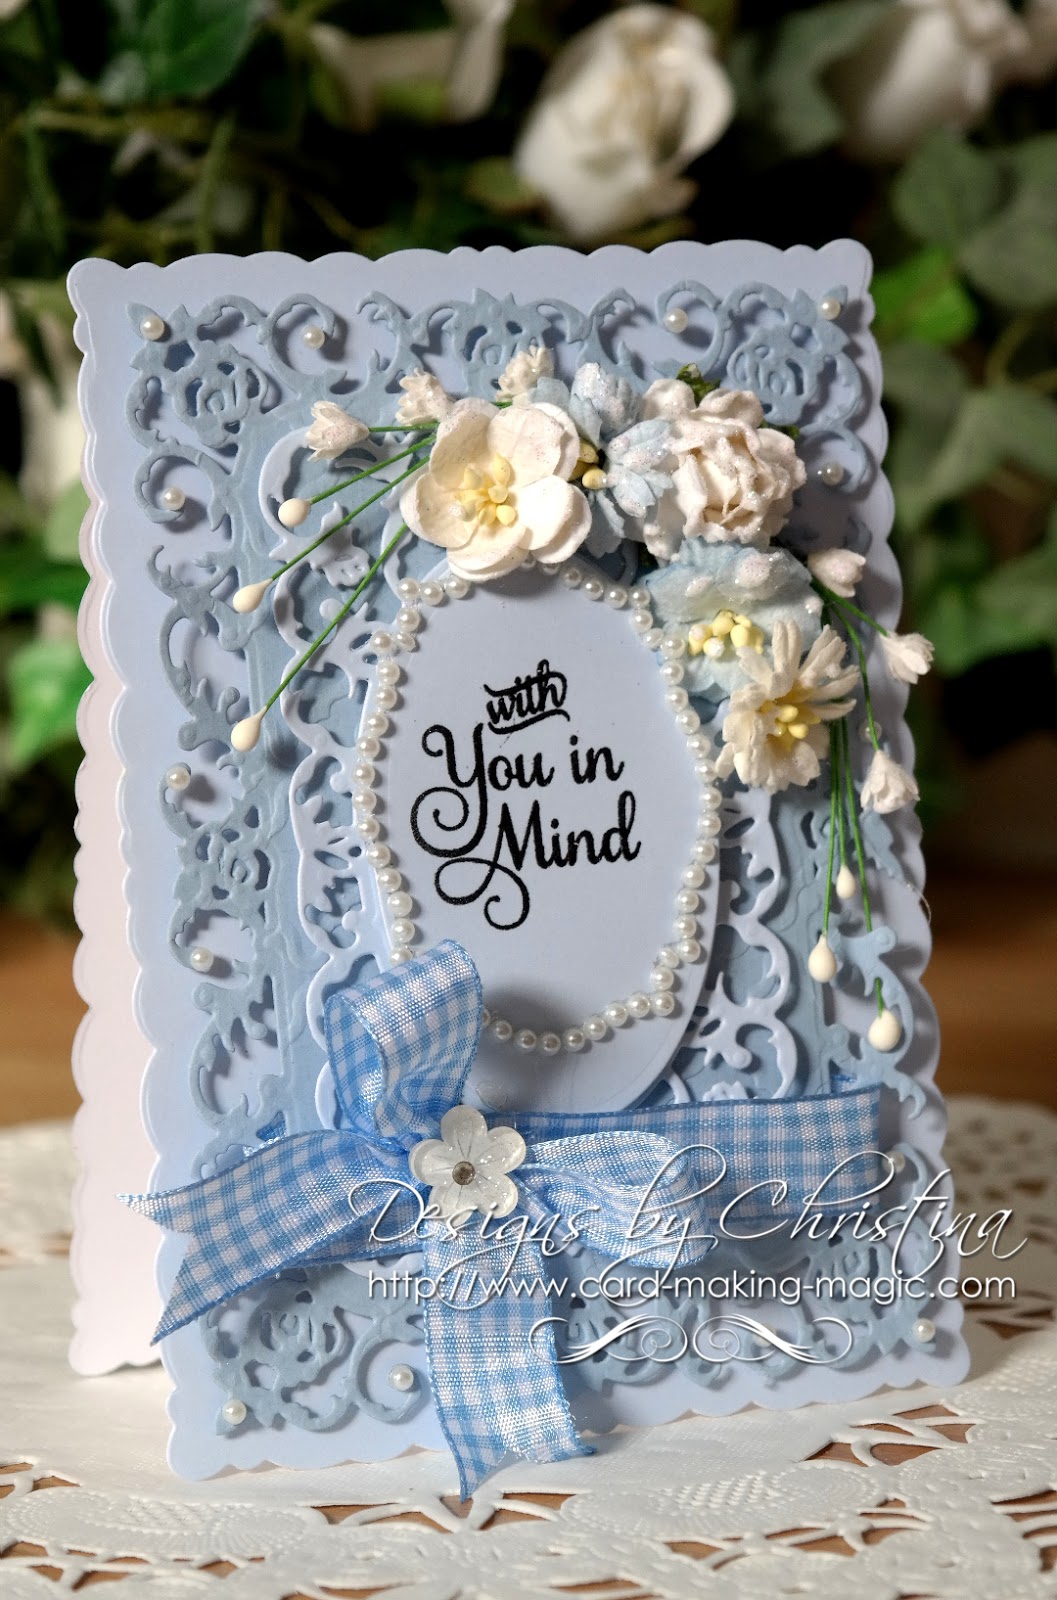
Spellbinders have produced and this is one of several that will create the whole card for you in one pass.  The card will be 4 3/8  x 5 1/2 "  which is a nice sized card

I have chosen some spotty blue card for mine and I think the effect is very fresh.
 Spellbinders Supplies:
With the large outer frame cut one piece in white. 
This will now be scored for you in the places you will need to fold the card ... but not just yet !!

From the inner step die cut two pieces in the colour of your choice. 
I chose the blue spotty one for mine
With the same card and the square dies cut four pieces. 
They are all the same size even though there are two dies.
Cut one of the border strips twice and and as many leaves and flowers as you wish to add to your card. 
Cut the words and Ink through the die before removing the card from it.
Glue the step panels in place onto the base card and add the four squares to the centre step parts. 
Add the borders along any edges that you prefer.
Press the card base into shape by mountain folding the front score lines on the left, and valley folding the back ones on the right to create the steps.
 And your card should look like the picture once you have done that. 
I added in the inked words to the top right of my card and I chose to add the mulberry flowers from Wild Orchid Crafts to make it glamorous.  The petals have all been sparkled with Glitter Magic and I have tucked in the die cut leaves to the display

You can add in any sentiment that you have as a change and make it for any occasion.
And even with the flowers added this will fit into an envelope so no need to make a box this time !!

More tomorrow ...

Hugs xx

October 12, 2015

Thinking Of You ...

Hi Everybody,

This is one of the sample cards that I made using the sentiment dies from  Craft Stash 

There are lots in the  Creative Dies - Sentiment Collection   for you to choose from and they will say just about everything that you want them to do and all at a really good price

I have used  Oval Florals  from Spellbinders for the centrepiece
and added the words cut from Craft foam to the top.

The flowers are from Wild Orchid Crafts and so is the lace

The card is made from white card that has been embossed and cut with Scalloped Borders One

I have chosen a pale shade of green as my accent colour using satin ribbon from Mei Flower

The top layers have been added to the base card with a really soft gold layer in between and it just adds that little extra to the card.

The gold card is some that I bought from the craft show and the White Hammered Card is from   Papermill Direct  scroll down their page to see all the beautiful colours they produce

More tomorrow ...

Hugs xx


October 11, 2015

Easy Fold Card (Video Tutorial)

Hi Everybody,

Over the years I have done several videos on how to create a base card that you can use to decorate any way you wish  Some have been using plain smooth edged card and others have used the fancy die cuts that will make a patterned edge for your designs. 
There is even one to show you how to simply make a stand for the back of the card


I know that sometimes it is hard to get the die to cut through two layers of card to make the filigree hinges and so  today I am adding a quick video to show you an easier way to create the base.

 I thought that this may be the best way to show you exactly what it is I am doing to make two equal sized pieces of card fit together to make a solid base and it applies to any size or shape of card that you wish to make. 


I hope that this helps you to make some different shaped bases and gives you another way to use any of the fancy dies that you may have in your collection

More tomorrow ...

Hugs xx

October 10, 2015

Card Winner this week ...

Hi Everybody,

My Saturdays seem to get more full each week and so this is another late post for me.  But none the less the draw has finally been completed and the card winners name has been chosen.

The lovely turquoise card is coming to live with you ....

Bente Sorflaten

could you send your postal address to 
christina@card-making-magic.com
and the card will be on it's way to you straight away.

You have 48 hours to claim the card and I hope that you will like it when it arrives. Please let me know when you get it.

More tomorrow ..

Hugs xx

October 09, 2015

Friday Freebie - 088

Hi Everybody,

I have another card to give away today and this one is another Weaving Dies  by Sue Wilson and in a a lovely shade of turquoise.

The flowers around the sentiment are from Wild Orchid Crafts  and I have curved them around the shape.

The pearl flourish is from Want2Scrap  and I have tucked it behind the flowers

So would you like to be the owner of this card ? then all you need to do is leave me a comment and join the group of regular followers to see other goodies that are on offer

A winner will be drawn from the comments and  the name announced in tomorrows blog post so please, please come back and check to see if it is you.

More tomorrow ...

Hugs xx

October 08, 2015

Step Card ...

Hi Everybody,

A card with a difference and this is a really easy stepper card that requires no measuring and no dies to get the basic shape

I did this in a video almost six years ago and if you watch it you will see how  I have progressed since it was done.

I should maybe do a newer version of this card but the idea is so simple and easy that the video still says it all


For the newer card I have created it in the same way but I have added in dies to decorate it and for this I used the   Interlocking Love    from Spellbinders.   This is a die that I have used many many times and I really like the effect that it gives.

The flowers are white Roses from   Wild Orchid Crafts  and they have been glittered up with  Glitter Magic  The white satin ribbon is from  Mei Flower  and it is tied into a double bow

The card I have used for the base of  this is silver foiled pale blue from  Cardcraft Plus  and they
have many other colours and patterns.

More tomorrow ...

Hugs xx


October 07, 2015

Peach and White

Hi Everybody,

I love the deep shade of peach with this card and it goes so well with the white. of the ribbon.

I chose lovely peach, white  and orange flowers to go with it and they are a mixture of Roses, Rose buds,  Carnations and Lilies and they are from Wild Orchid Crafts

I have used a fine glitter on all the petals to sparkle them up and I use the Iridescent Chameleon from Glitter Magic

The white satin ribbon is from Mei Flower and it is tied into a single bow. The diamante centre is from WOC

I have made a peach pearl Hat pin to push into the bow and they are from the Sparkles Group and come complete with end protector

The dies I have used are from Spellbinders and the white panel is #3 from  Labels 47 Decorative Elements

I have layered this with Oval Majesty  and used dies #3 and 4 and the card I have used is from  Papermill Direct  and is about 240 gsm

All the layers are separated with foam pads to give dimension to the card. The verse is from Clarity Stamp

More tomorrow ...

Hugs xx


October 06, 2015

Tuesday Tutorial - Romantic Rose

Hi Everybody,

Todays pretty blue card is created with the romantic Rose from Spellbinders and it makes the loveliest of cards for all your female friends. I have created mine in two shades of pastel blue but it would look good in any colour that you choose.

It is a simple layered card ... quick and easy to put together for any occasion.
Spellbinders Supplies:
Other Supplies:
From die  #3 cut two panels to make the base card from pale blue card (die #1 is always the smallest)
Take one of these panels and score and fold  it  on the short side by about an inch. Add glue to the folded edge and glue the two together along this edge only. 
This will create an  "A"  frame leaving the rest of the card open for it to stand  ... as your base card. 
Make sure that the correct side of the card is on the outside
From #2 and some darker blue card I have cut one panel and from the same base card and die #1 I have cut another smaller panel
Layer the two together with foam pads between the layers and wrap with ribbon before adding to the base card
Have a dry run with flowers and bows to see where you like them and when you are happy with the arrangement glue them in place.

 I use a hot glue gun but be careful as they get very hot and will burn your skin if you drop the glue onto it ... How do I know this ????

Heat emboss your sentiment and cut with the oval and add with foam pads to the front of the card.
Glitter the flowers and decorate with pearls for a really pretty effect to your designs.

More tomorrow ...

Hugs xx


October 05, 2015

Especially For You ...

Hi Everybody,

This pretty card is created from the Sapphire Collection of dies by  Spellbinders  and I used the Squares from Basic Set A to make the frames

I simply added the two largest squares together to form the frames and then topped them onto some lovely rose patterned paper.

Each of the frames was edged with pearls from Want2Scrap  and I had to cut down foam pads into thin strips to sit behind each edge to give it some height.

They have been layered diamond pattern onto the card and the bottom part wrapped with ribbon and pearls

Very simple but very effective and with a change of colour and sentiment it could be for any occasion

And although these are Sapphire dies they will go through any die cutting machine that you have.

The  Sapphire Machine  and the dies is available to buy from Create and Craft

More tomorrow ...

Hugs xx

October 03, 2015

Card Winner for Today ....

Hi Everybody,

Sorry for the late post but this is the first chance I have had to get it done. I was out and about early and although a little colder it was still very pleasant to be out shopping.  Later today it will be playtime with Isabella and I am really looking forward to that.

So without any more preamble we will get straight to the point about the winner of yesterdays blue card.

The draw has been done and the name drawn from the hat is ...

Kazzie Ice 
and if you would like to send me your postal address to 
christina@card-making-magic.com
then I will get the card in the post to you straight away.

You have 48 hours in which to claim the card and I hope that you will like it once it arrives with you.

Thanks to everybody for adding your names and there will be another card on offer next week

More tomorrow ...

Hugs xx


October 02, 2015

Friday Freebie -087

Hi Everybody,

Todays freebie card is in blue and uses the Interlocking Love die from Spellbinders

It is one that was featured in the past and was a FF card that was won and never claimed ... and so here it is again.

It is an 8x8" card and there is an envelope with it should you wish to use it.

If you would like to own this card then all you need to do is join the followers and leave me a comment.

From those comments a name will be drawn and the winner announced tomorrow.  Please come back and check if it is you as you only have 48 hours in which to claim the card.

More tomorrow ...

Hugs xx

October 01, 2015

Emerald card

Hi Everybody,

For this card I have used the Emerald Green from Brusho Crystal Colours and teamed it with Black and White

The Octagon die that I have used along with the Scalloped Octagons are now retired from the Spellbinders website.

To this I have added the "Hello" which is a matching die and stamp set from  Altenew.

I bought mine from Make The Day Special  and they have all the latest stamps and dies from many many companies.

I thought that this turned out to be quite a striking card and is just another way to use up all these playtime sheets I made with the Brushos and using dies that I already have in my "Stash"

More tomorrow...

Hugs xx